Pages

Subscribe:

Friday, September 23, 2011

HTML5


HTML5
The new vision of HTML is HTML5 .You Can Find new Updates About HTML5 from W3 click here to see .W3(World Wide Web Consortium) is the main  international standards organization for WWW (World Wide Web).To know more about W3 Click here for Wikipedia .
The newly add Features specially for videos and for adios.See the bellow codes for vedios.

<video width="330" height="250" controls="controls">
  <source src="myname.mp4" type="video/mp4" />

Your browser does not support to this  video.
</video>

 You can add videos to your page easily now.But old browsers not support to the new htm5 version.
Code Discription
<video >
-this is the opening tag for videos.
 width="330" height="250" -enter some width and height for your video size.
 controls="controls" -give user to control video or not.(when you put "controls" user's browser give controls to the user.)
 <source src="myname.mp4" type="video/mp4" />-This is video parth.
 Your browser does not support to this  video-If browser not support to this video browser show this text to the user.
Codes for audio in new html5
<audio controls="controls">
    <source src="song.mp3" type="audio/mpeg" />
Your browser does not support to this audio .
</audio>  This code also same to the video html code.


Monday, August 29, 2011

Ho to make a iframe(show othe site on your blog or website) html code-2


This is a simple html code.And easy to use.

Chang "http://www.google.com" (on this code) to other site that you want.
-Copy and paste these code to your blog or web site-(Learn how to add java scripts codes to your blog click here or to your web site click here)
-Code preview-Google page in a frame..
TO hide iframe change style="width:100%;height:100%" as style="width:0%;height:0%" .

Display & Save Visitor's Ip - PHP Code 1

PHP Logo

PHP-Hypertext Preprocessor.
PHP is a server side script language.Using php you can create a dynamic websites.
This is the first lesson and on this lesson you will learn how to get visitors ip and save it on your server.(i wil learn you how add this to your blog  or any web sites that haven't php.)
-Display User's informations-
-Code Descriptions-
<?php -to start php file.
$ip - give a variable  name to $_SERVER['REMOTE_ADDR'] (like y=mx+c).
$_SERVER['REMOTE_ADDR']-this is the code that get user ip.
gethostbyaddr($ip) -to get host name.
$_SERVER['HTTP_USER_AGENT']-get browser information.
$_SERVER['HTTP_REFERER']-get where user come from.
//-we use this to put a comment in our php file.// for 1 line comment.
/*-
this is for long comment and end with */

print"what you want to display on the page";-we use this to display something on the page.
<br>-this is for line break .when we use this code.the text after this code will display in next line.

How i save user's Informations ??


-Code Descriptions-
$myfile="countip.mic"; -$myfile is the variable that for "countip.mic".
fwrite($fh,$stringData); -do that discribe on $fh variable and $stringData .(create countip.mic file and save data).
fclose($fh);-close the file that we open.
we get the date  time to countip file using .date('Y-m-d H:i:s).code.

Code for Display user's information and Save(broth in one file) .

How I put this code to my website ??
First i will learn you how to add this code to your hosting that php working.

When you add this php codes to your blog or web site you must have another hosting that  php working.Many hosting providers give free php working accounts.
First you must get a free hosting account.
(click here to google search about free accounts.then select one and Register on it(eg:www.000webhost.com )).

1.Create file on your desktop with .php extension (eg:countip.php)  .
2.Copy the code and paste it on your file.
3.Save it and Upload it(your file) to you hosting account.
To download php zip file click here.(extract zip fle and upload it)
(To Upload Your file to your hosting account  .you can use Filezilla software).
Then go to your file (after you upload it) using a browser.You can see your informations on your page.
Click here to see preview. And click here to see the save file on the server.

To get this code to your blog or website( that php not working) read this post click here.


Blogs and web sites.


If you  want a web site you must have money to buy it and you must also have web design knowledge to maintain your site.
But If you make a blog site you can maintain your web site easily and full of free.No need a good knowledge about web design also .
Blogger.com
is the best way to start a your blog.You can start blogging with your gmail account blogger service provided by goolge .

Sunday, August 28, 2011

Show user's Ip address - java script code 2

Ip address
On this java script visitors can see their Ip on a box.And visitor can't edit it.

-Copy and paste these code to your blog or web site-(Learn how to add java scripts codes to your blog click here or to your web site click here)
This script not working on you blog .This is only for your web site.

How i add Java scripts to my web site ??

To get more features to your web site you can add Java scripts to your site.
You must add Java scripts to <body> tag in your page.
Eg:

<body>
your java script here..
</body>


Find <body> tag in your site and paste java script between  <body> and </body> tags.
Add Java scripts to web page

Then Upload it to your hosting account.

How i add Java scripts to my blog ??


How i add Java scripts or html codes to my blog ??
By adding java scripts to your blog you can get more features to your blog like a web site.
  • First go to your blogger dashboard (click here).
  • Select your blog.
Blogger new dashboard
  • Click Layout tab on the side bar

Blogger Overview
  • Click Add a Gadget link
Blogger Layout
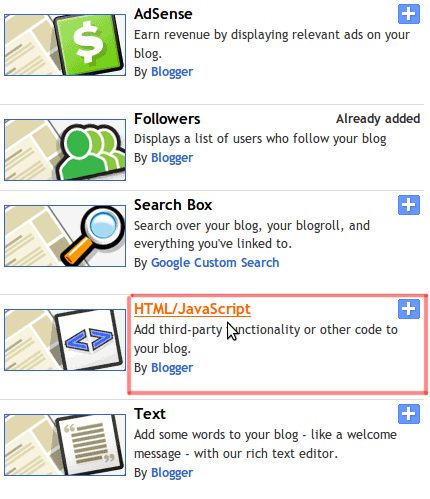
  • Then open a new window and Select "Html/Javascript " from the new window.
    Add a Gadget

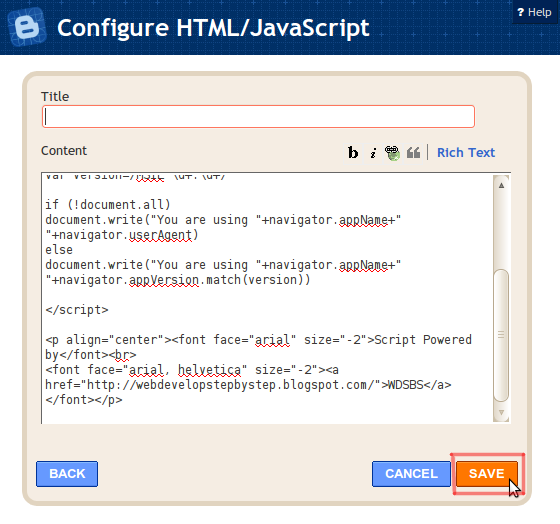
  •  Paste Your Code to Content(Enter a title if you want)

    Add javascript to content
    • Then click Save Button.

Show user's Browser information-Java scripts Code 1

Java scripts
This is a simple code to display visitor's browser informations like browser type,Name,Opereting system and Browser Version.When you put this code on your blog or web site visitors can see informations about their browser and Operating system.
-Code preview-


This is about your browser.And if you want to save your visitor's informations read "Save Visitor's Ip - PHP Code 1".Or you can use google analysis tools .

-Copy and paste these code to your blog or web site-(Learn how to add java scripts codes to your blog click here or to your web site click here)


Next>>Show user's Ip address using java scripts.

Saturday, August 27, 2011

Html (Hypertext Markup Language)Lesson 1

  • What is Html?
It's Web design language that browsers can understand.Browser read page's html codes and make a visible page to the user (friendly way). HTML mean Hypertext Markup Language.
  • What do you want to learn html??
Only a notpad software and browser to see your page.
  • First lesson(Html code part 1)
1.Open Notepad Software(How to:Start>all programmers>Accessorice>notepad)

2.Enter these codes

<html>
<head>
<Title>My first web page</title>
</head>
<body>My page 1</body>
</html>


3.Save it (Name must with .html extension)Eg:index.html
4.Open file that you saved.
Description about the codes
<html> - Start html document.
<head>-This is the head of the page.
<Title> -Title of the page.
<body>- The contain of the page.
Every code must close that we open .Normally Start like <> and end with </>
Bellow table show you how some html codes start and end.

Start code Discription Close code
<html> To start html page </html>
<title> The title for the page(show in title bar) </title>
<body> The body of the page </body>
<head> Page title  </head>
<h1> font size <h1>to <h6> </h1>
<center> To center in web page </center>
<table> Make a table </table>
<tr> Table row </tr>
<td> Table draw </td>
<a href=""> Link </a>
<img src=""/> image into web page(e.g.:<img src="apple.jpeg" width="200" height="300">) None
  • Html codes(part 2)
    Work with
    (title , body& font size )  
  • <html>
    <head>
    <title>My second web page</title>
    </head>
    <body><h1>My page2</h1></body>
    </html>
    • Html codes(part 3) 
           work with a table
    <html>
    <title>Make a Table</ttitle>
    <body>
    <table border="1">
    <tr>
    <td>Name</td>
    <td>Age</td>
    </tr>
    <tr>
    <td>Smith</td>
    <td>17</td>
    </tr>
    </table>
    </body>
    </html>
    • Html codes(part 3)
      (hyper links)
    <html>
    <title>Hyperlink</title>
    <body>
    <a href="www.google.com">Google</a>
    </body>
    </html>
    • Html codes(part 5) 
    Add Image to web page
    <html>
    <title>image</title>
    <body>
    <img src="apple.jpeg">
    </body>
    </html>

    • Html codes(part 6) 
    Add image  with width & height
    <html>
    <title>image</title>
    <body>
    <img src="apple.jpeg" width="200" height="300">
    </body>
    </html>


// //